
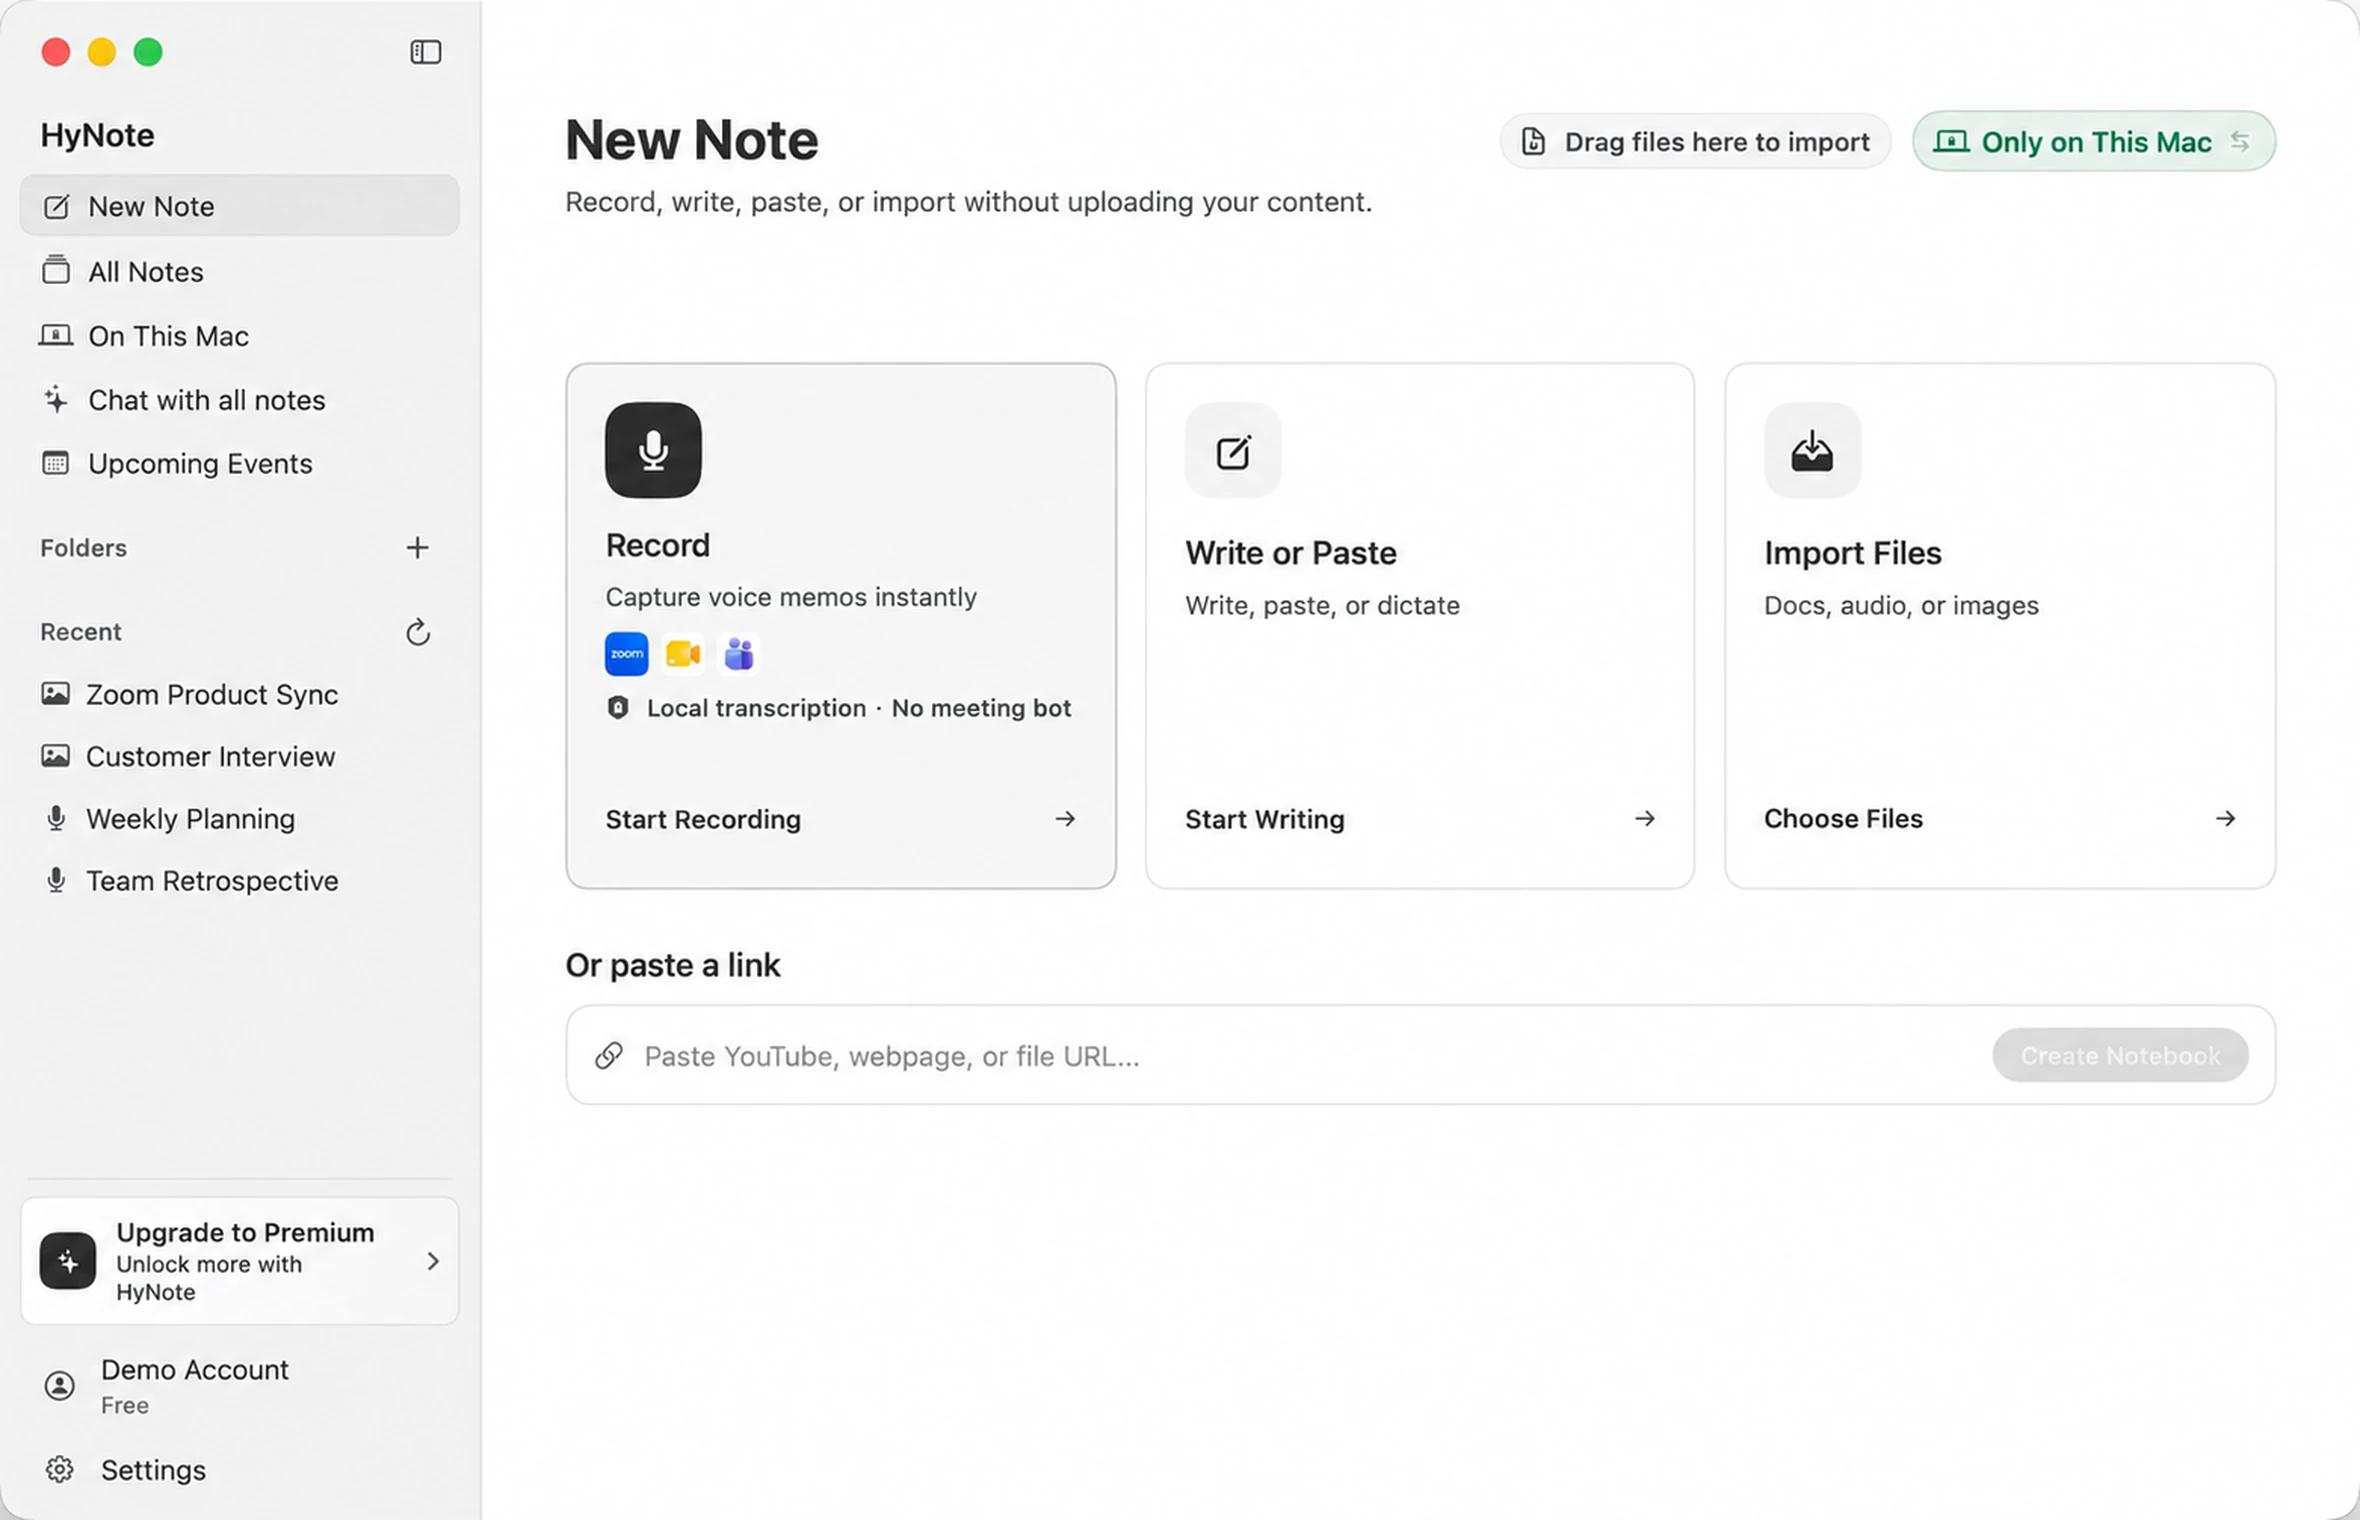
Zoom recording or HyNote for Mac?
Use Zoom's option when a shareable video is the goal. Use HyNote when the useful output is a searchable conversation, decisions, and follow-up work.
| Method | What it saves | Who can start it? | Transcription | Participant bot |
|---|---|---|---|---|
| Zoom computer recording | Meeting video, audio, and available meeting views | Host or a participant given permission | Not included with computer recording | No |
| HyNote for Mac | System audio, microphone audio, transcript, summary, and action items | The Mac user, subject to meeting rules and consent | Local or online, depending on the selected mode | No |
Zoom's computer recording is available to Basic and paid subscribers in the desktop application. By default, the host starts it. A host can also grant a participant permission to record to their computer.
Method 1: Use Zoom's computer recorder on Mac
Start a Zoom recording as the host
- 01
Start or join the meeting in the Zoom desktop app.
- 02
Click Record in the meeting controls.
- 03
If Zoom presents a choice, select Record on this Computer.
- 04
Pause, resume, or stop the recording from the meeting controls.
- 05
After the meeting, wait for Zoom to finish converting the recording.
Zoom saves computer recordings on the Mac, normally under /Users/[Username]/Documents/Zoom. The recording can include an MP4 video and M4A audio file, depending on the selected recording settings.
Zoom computer recording does not include audio transcription. Zoom lists that as a limitation of local computer recordings.
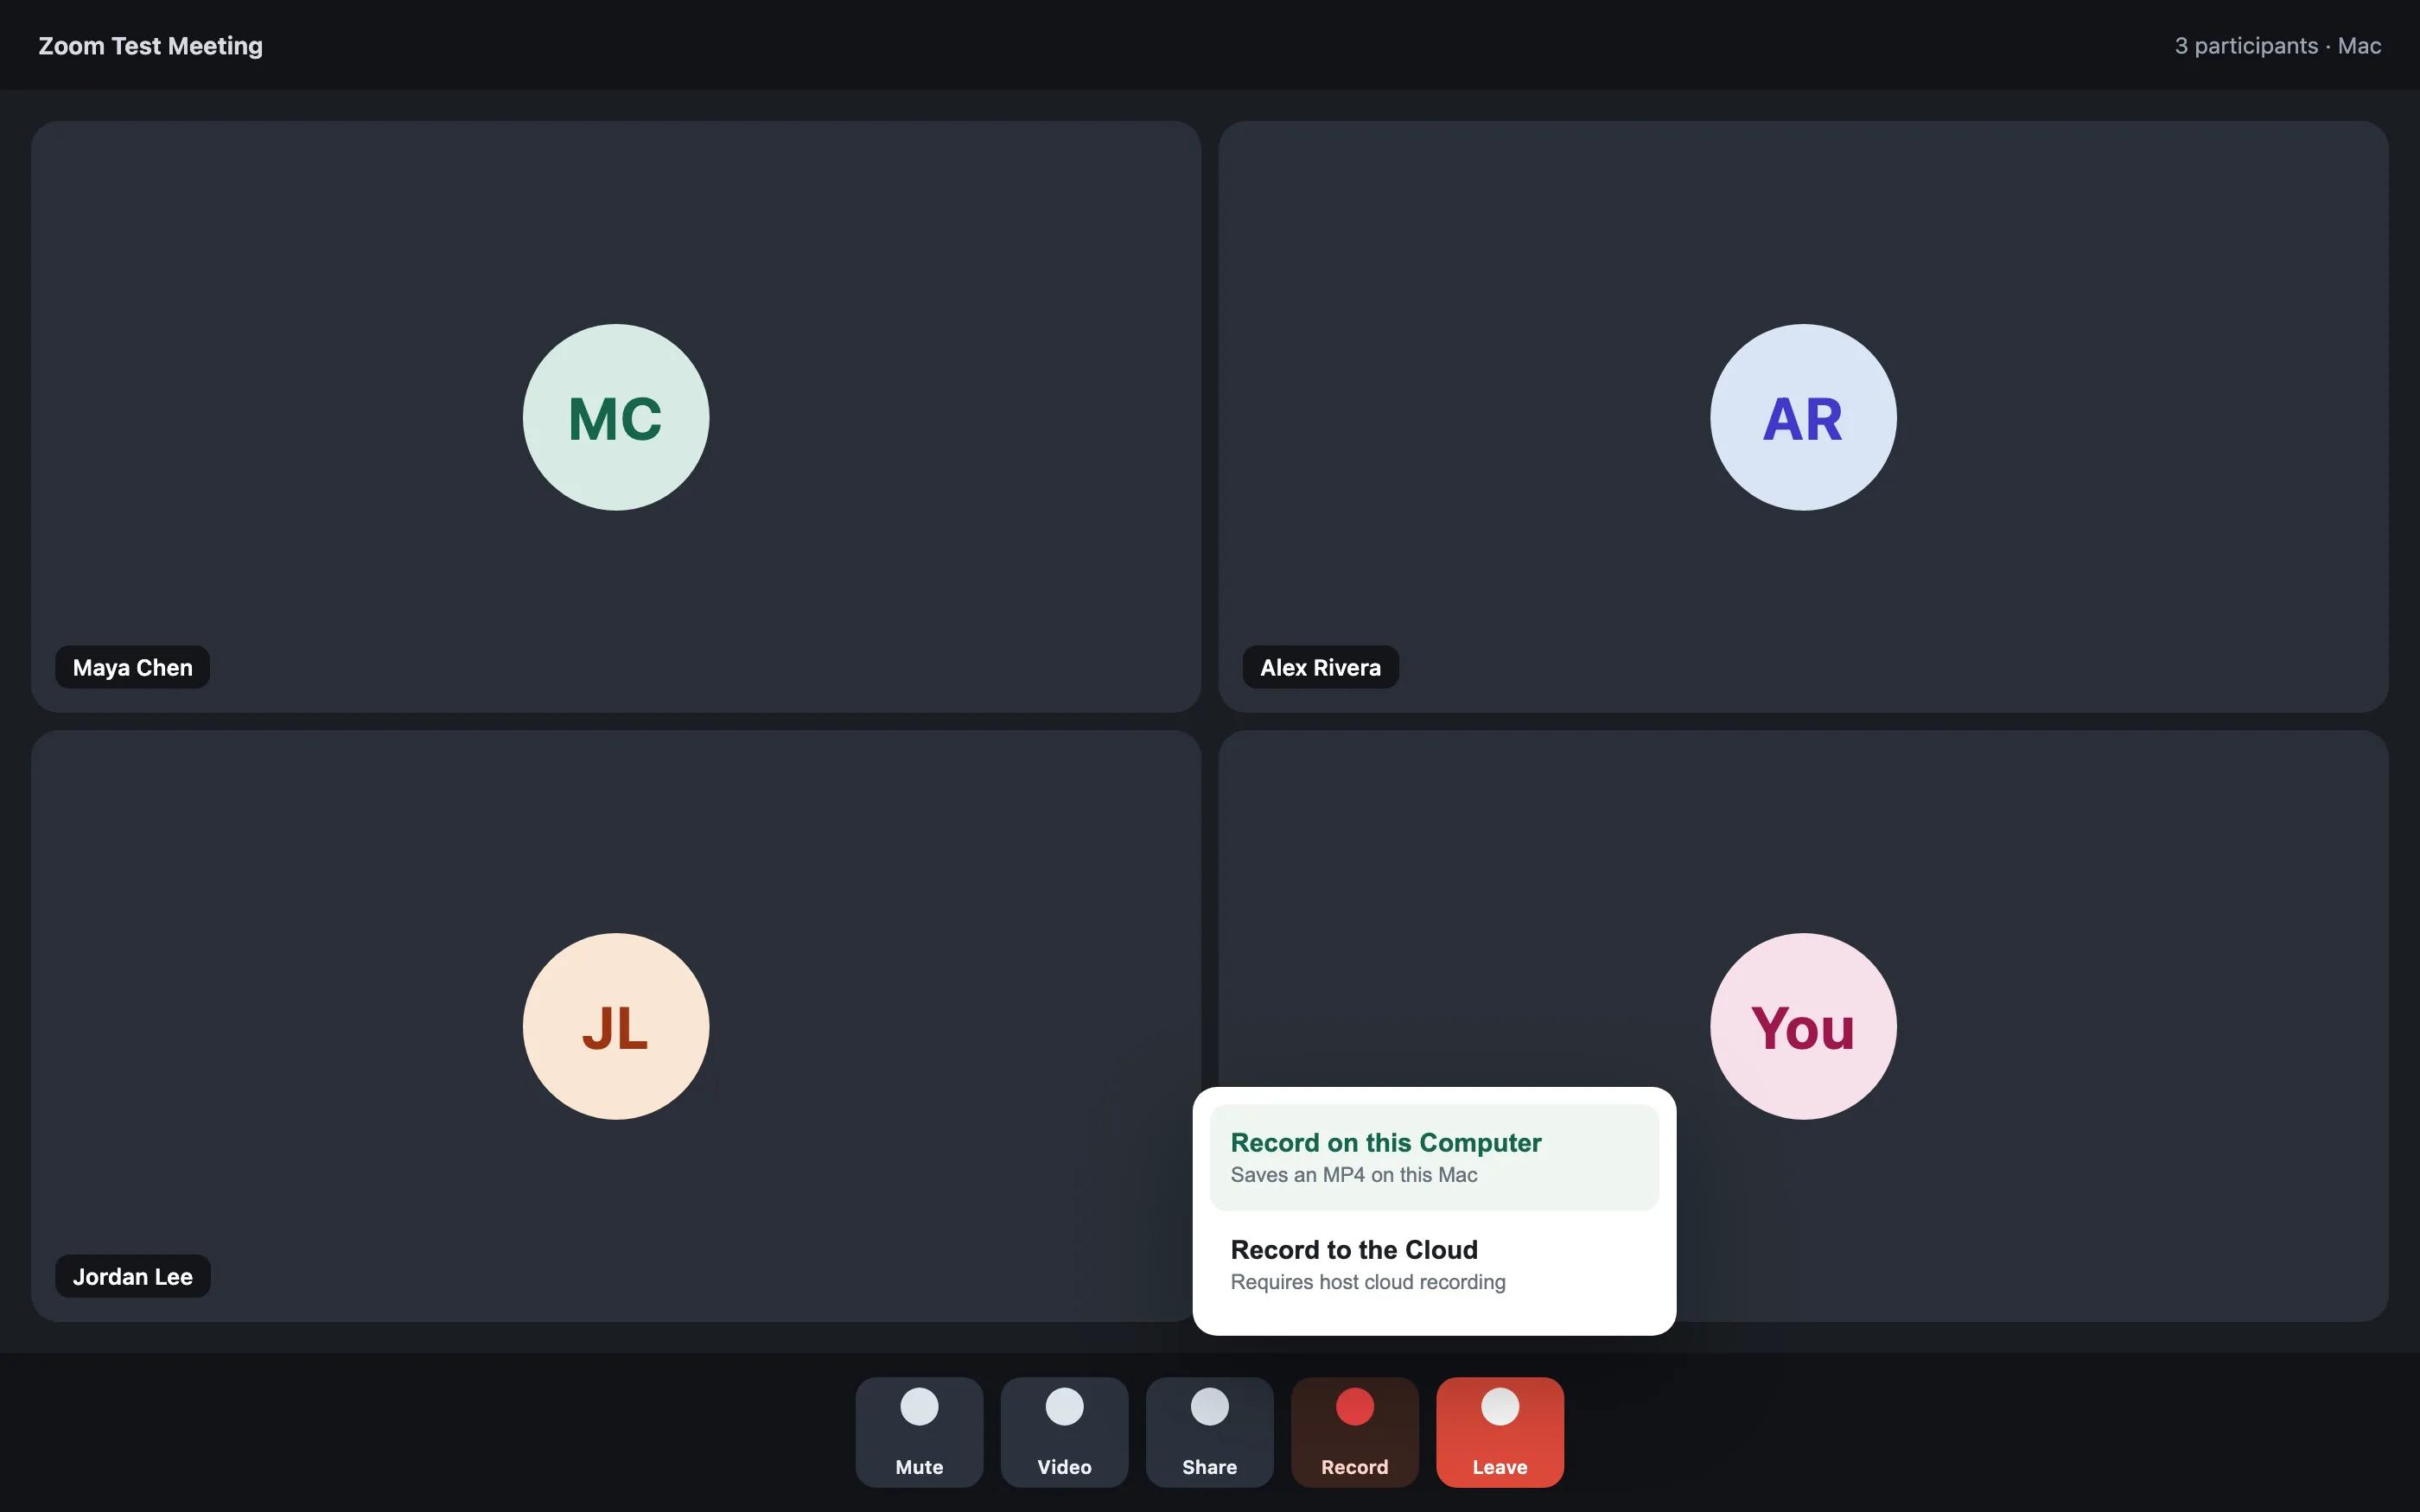
Record as a participant
If another person hosts the meeting, Zoom may show Request to record to this computer. The host must approve the request before Zoom's computer recorder can start.
The host can also open Participants, select More beside your name, and choose Allow Record. Zoom shows a recording indicator while the built-in recorder is active.
See Zoom's current computer recording instructionsMethod 2: Record and transcribe Zoom with HyNote for Mac
HyNote for Mac records the sound playing through the Mac together with the selected microphone. It creates one meeting record containing the audio, transcript, summary, and action items.
Because HyNote runs on the device, no HyNote guest appears in the Zoom participant list and the host does not need to admit a separate note-taking account.
If one voice is missing, check the permission shown beside that audio source.
1. Install HyNote for Mac
Download HyNote and open the application. HyNote requires macOS 14 or later and supports Intel and Apple silicon Macs.
2. Let HyNote capture your voice and the Zoom call
Open System Settings > Privacy & Security. Allow HyNote under Microphone to capture your voice, and under Screen & System Audio Recording (or Screen Recording on some Macs) to capture the sound Zoom plays. This permission gives audio access; HyNote does not record your screen.
macOS may ask you to reopen HyNote after a permission change.
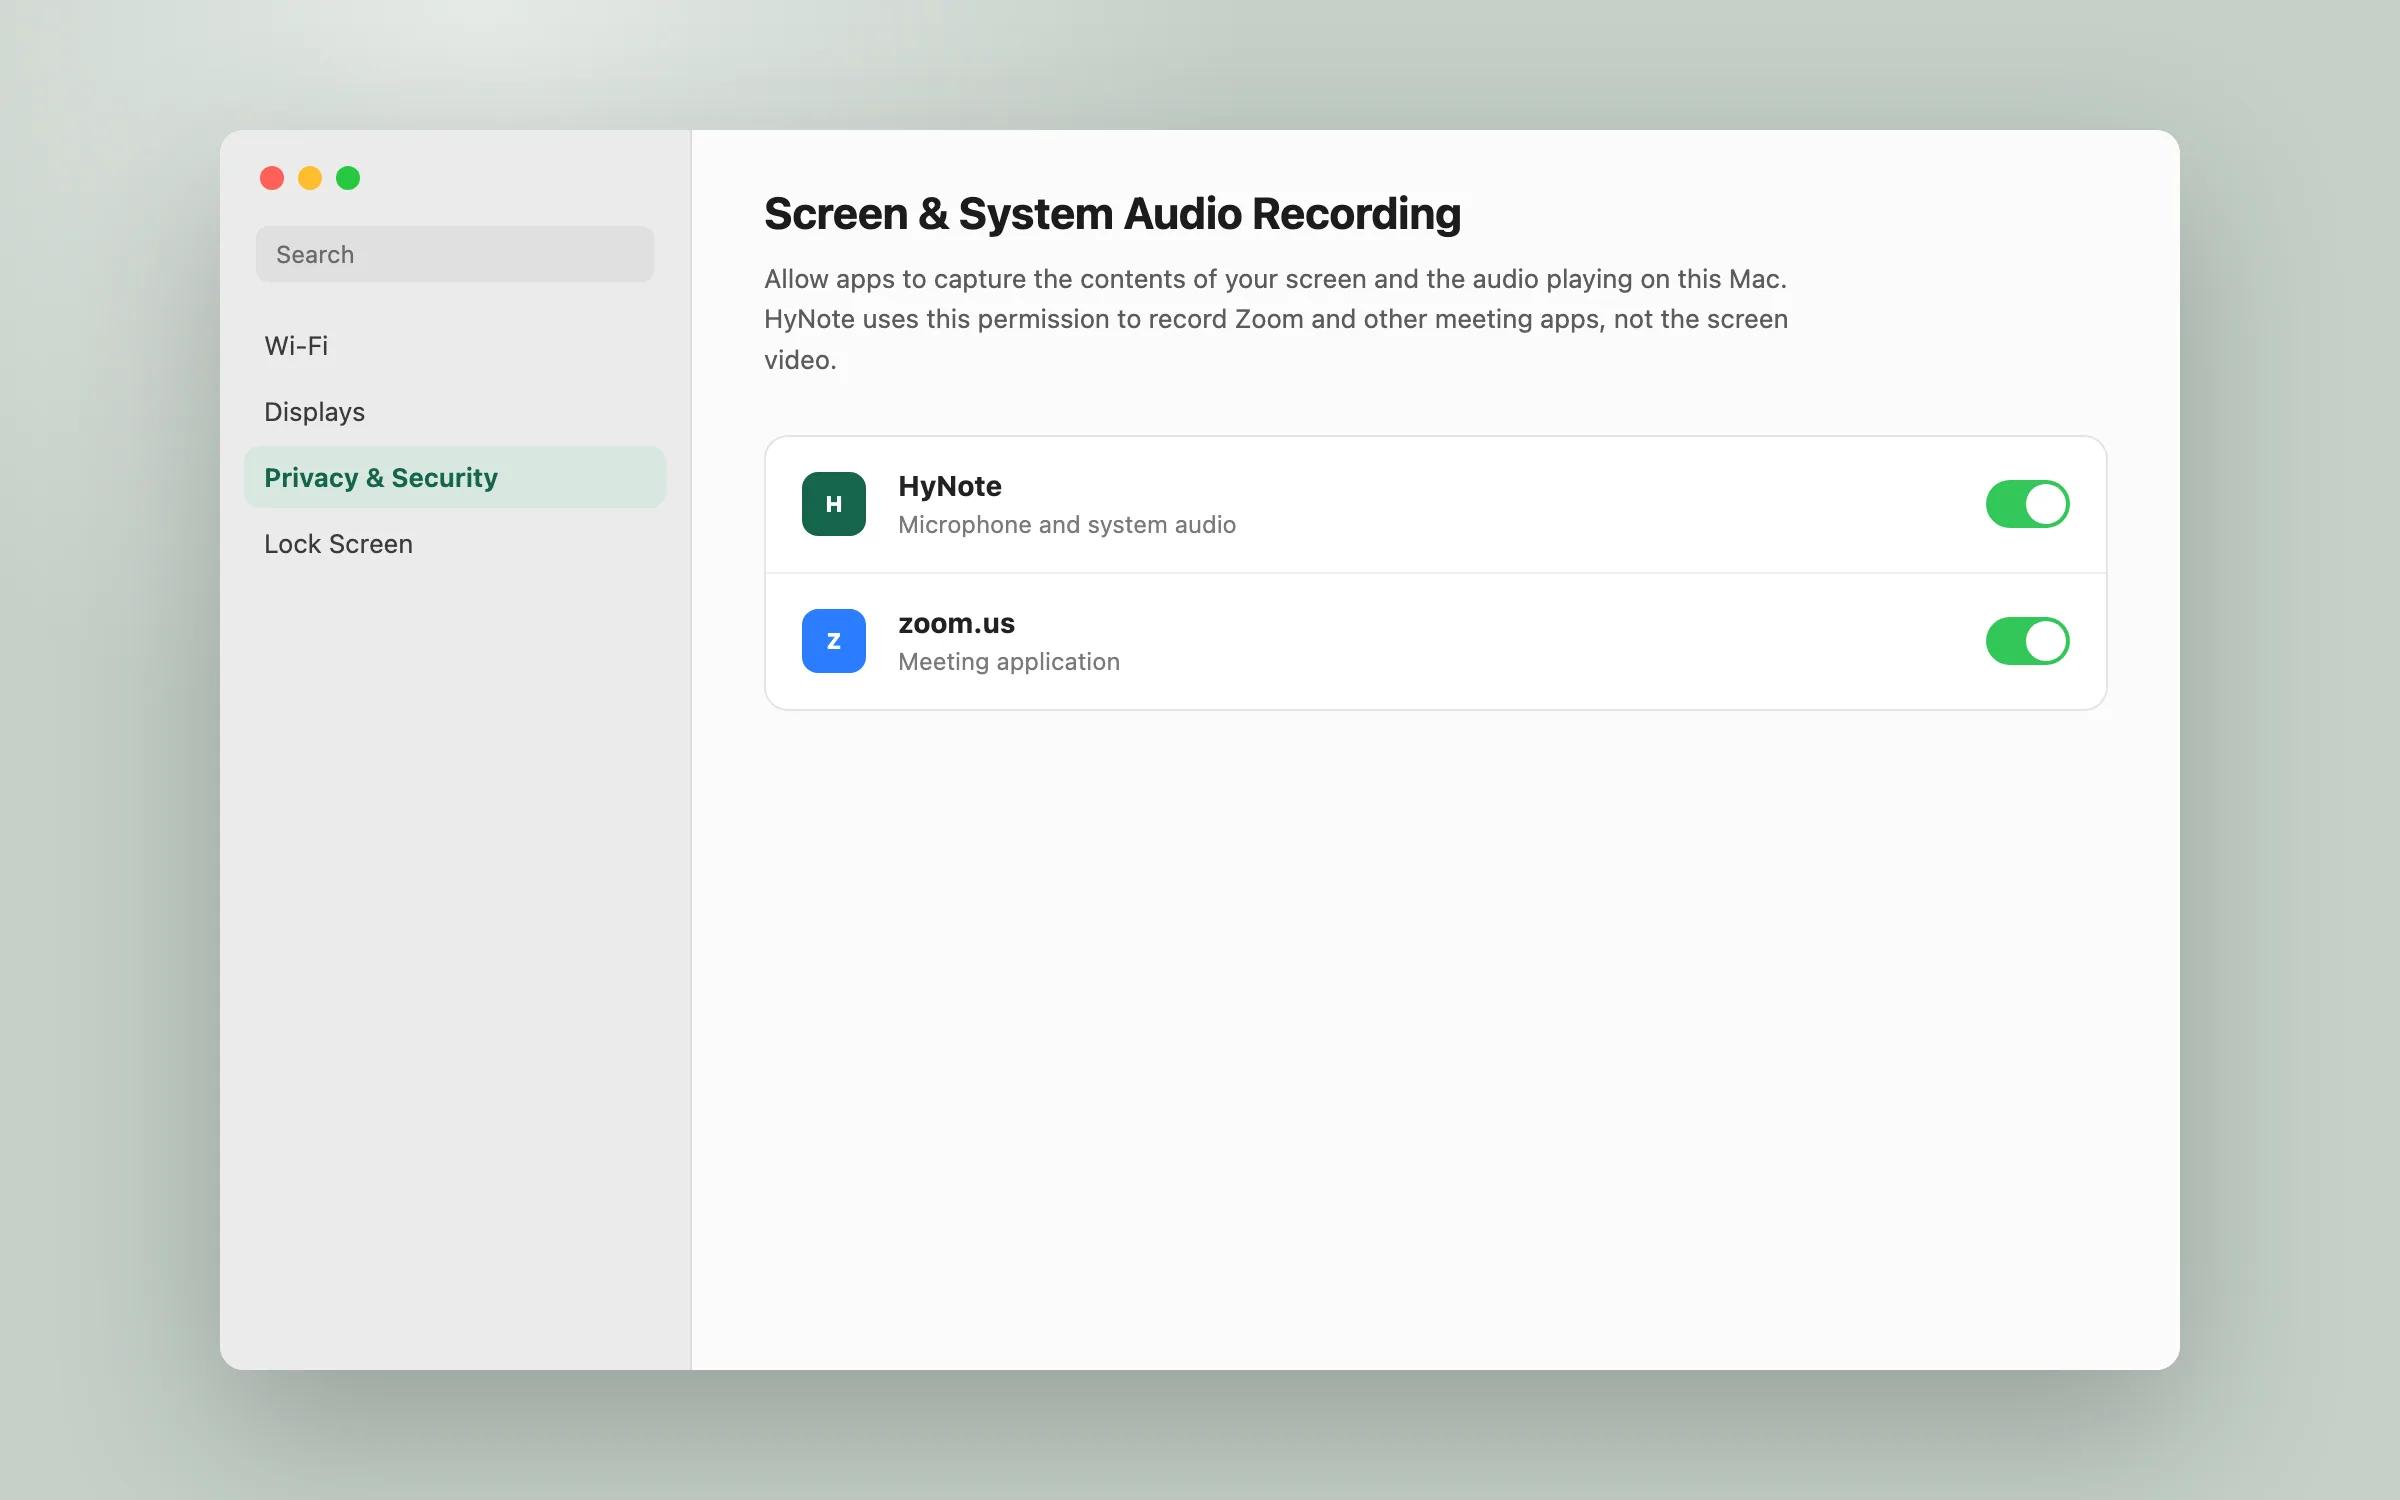
3. Test both sides of the conversation
Start a short Zoom test meeting before an important call. Ask another participant to speak, record 20–30 seconds, and listen back.
Confirm that the recording contains:
- your microphone;
- the other participant's voice;
- clear audio without echo or excessive background noise.
If you use Bluetooth headphones, check the selected microphone again after connecting them because macOS can switch the input device.
4. Start recording in HyNote
Open HyNote before joining Zoom. Tell participants that the meeting will be recorded or transcribed, then follow these steps:
- 01
Open New Note.
- 02
Select Record, then Meeting Recording.
- 03
Choose the spoken language and transcription option.
- 04
Start recording, then use Zoom as usual. HyNote captures audio from your Mac, so it does not need to join the call.
5. Review the transcript and meeting notes
Stop the recording when the meeting ends. Review speaker names, numbers, dates, decisions, and commitments before sharing the notes.
HyNote can prepare a summary and action items from the conversation. Keep the transcript available so that important details can be checked against what was actually said.
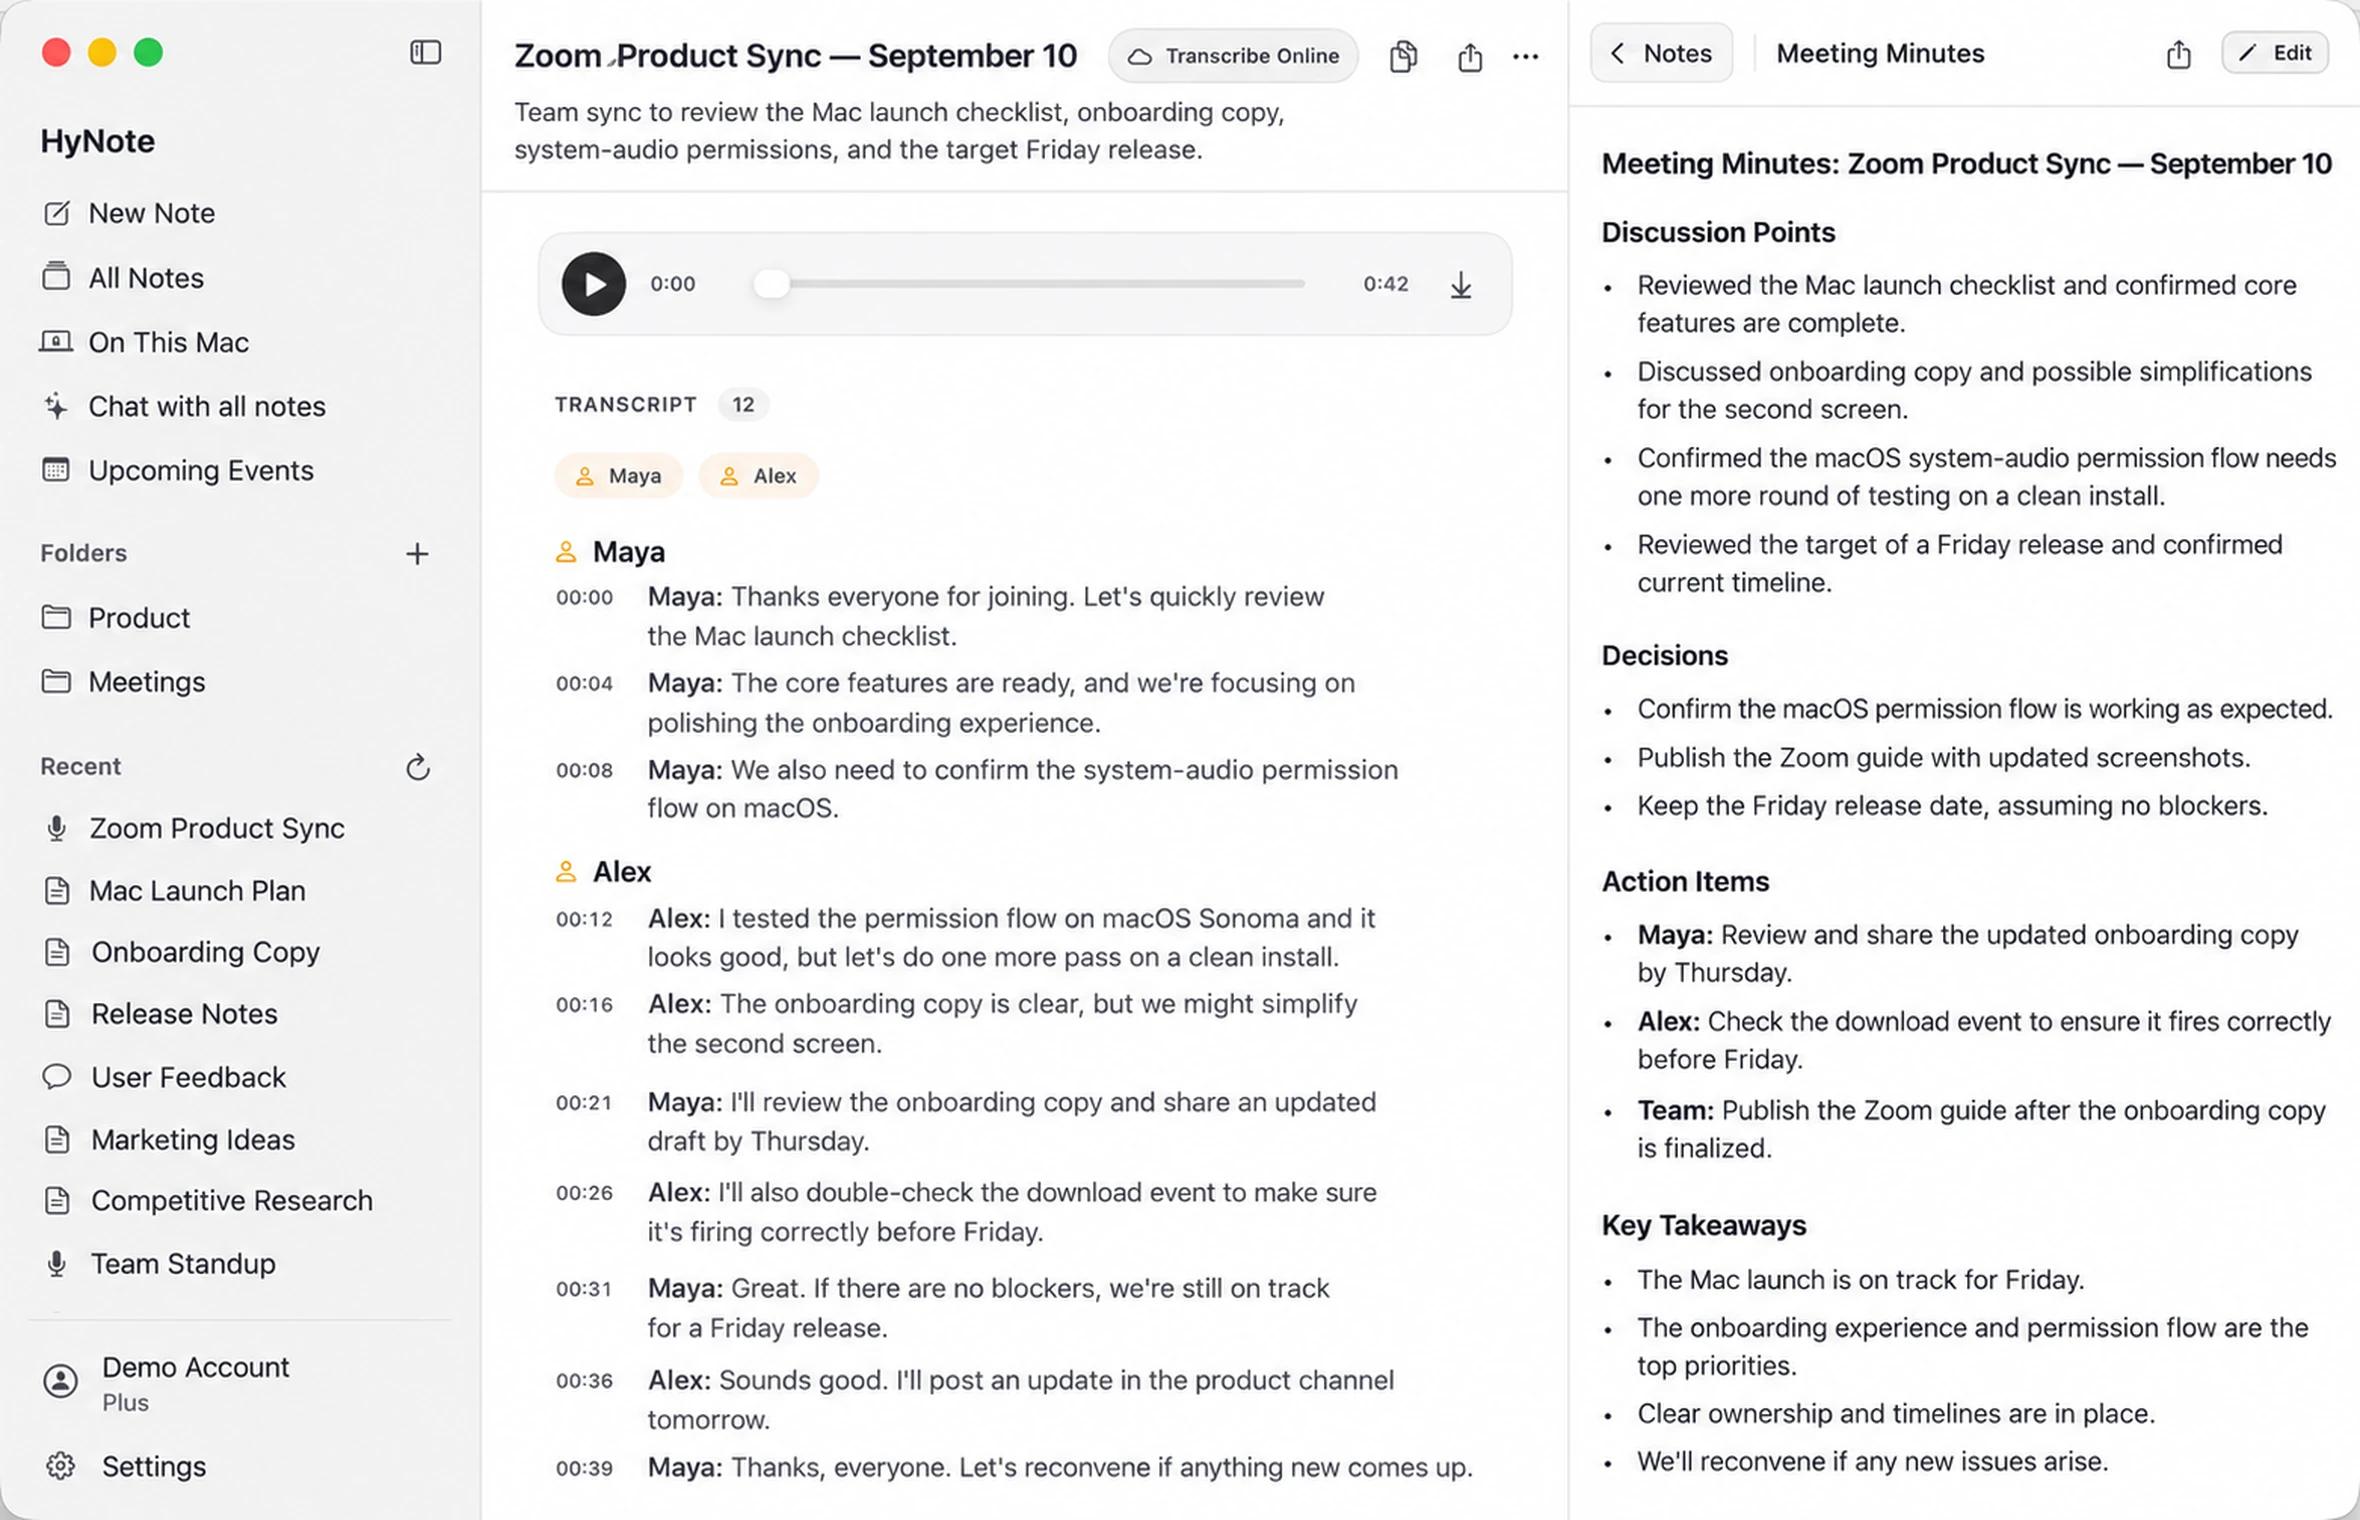
Why the Zoom Record button may be missing
The most common reasons are:
- you joined through a browser instead of the Zoom desktop app;
- you are a participant and the host has not granted recording permission;
- the host or account administrator disabled computer recording;
- the meeting controls are hidden under More because of the window size;
- the Zoom app needs to be updated.
When you only need a transcript and notes, HyNote can provide a Mac-level workflow. It should not be used to ignore the host's instructions, company policy, or consent requirements.
Can Zoom transcription stay on your Mac?
HyNote supports on-device transcription on compatible configurations. The complete Local AI workflow requires an M1 or newer Apple silicon Mac, macOS 26.4 or later, and Apple Intelligence available and enabled for your language and region.
Storage location, transcription mode, and AI mode are separate settings. Selecting On This Mac controls where the meeting is stored; it does not automatically make every transcription or AI feature local. Initial setup, model downloads, synchronization, and optional online features may still require internet access.
Check the HyNote for Mac page for current requirementsTroubleshooting Zoom audio recordings on Mac
The recording only contains my voice
HyNote can access the microphone, but system-audio access may be missing. Enable HyNote under Privacy & Security > Screen & System Audio Recording, reopen the app if requested, and test again.
The recording contains Zoom but not my voice
Verify the microphone selected in HyNote. If you connected AirPods or another headset after opening the application, macOS may have changed the input.
The transcript is empty or delayed
Check the selected transcription mode. Online processing requires an internet connection, while local transcription may require compatible hardware and a downloaded model.
The meeting audio has an echo
Use headphones and confirm that Zoom and HyNote are using the intended microphone. Playing the meeting through speakers can feed the other participants' voices back into the microphone.
Zoom's recording is missing
After a Zoom computer recording ends, allow the conversion process to finish. Closing the laptop or interrupting Zoom during conversion can prevent the files from being created correctly. Zoom normally stores finished computer recordings in the Mac's Documents/Zoom folder.
For headphones and recordings that contain only one side, see how to record system audio and microphone on Mac.
Recording without a bot still requires consent
Zoom states that participants are notified when its built-in recording starts. HyNote does not create a Zoom participant tile or use Zoom's recording control, so you are responsible for clearly telling participants when you record or transcribe with it.
Follow applicable law, host instructions, client agreements, employment rules, and your organization's data policy. Stop the recording if consent is withdrawn.
Frequently asked questions
Can I record a Zoom meeting on Mac for free?
Yes. Zoom computer recording is available to Basic and paid accounts in the desktop app, subject to host and account settings. HyNote also includes a free core Mac workflow; see the current Mac pricing information for limits and optional online features.
Can a Zoom participant record the meeting?
Yes, when the host grants recording permission. In Zoom, use Request to record to this computer, or ask the host to select Allow Record beside your name.
Does HyNote add a bot to Zoom?
No. HyNote runs on the Mac and captures system audio together with the selected microphone. It does not add a HyNote account to the Zoom participant list.
Does HyNote record Zoom video?
No. HyNote records meeting audio for transcription and notes. Use Zoom's computer recorder when you also need meeting video or the shared screen.
Does Zoom notify participants when recording starts?
Yes. Zoom states that meeting participants are notified when a Zoom recording starts. Notification details depend on the participant's device and account settings.
Can QuickTime record both sides of a Zoom call?
QuickTime can record the screen and a selected microphone, but it does not capture the Zoom participants' system audio by itself. HyNote uses macOS system-audio access to capture the call together with your microphone.
Does HyNote work with Zoom in a browser?
Yes. HyNote captures Mac audio sources, so it can record Zoom in the desktop application or a browser, as well as Google Meet, Microsoft Teams, FaceTime, and other Mac apps that play audio.
Record your next Zoom meeting on Mac
Use Zoom's computer recorder when you have permission and need a video file. Use HyNote for Mac when you want an audio recording, searchable transcript, summary, and action items without adding a participant bot.
Sources
- Zoom Support: Starting a computer recording
- Zoom Support: Managing computer recordings
- Zoom Support: Recording notification prompts
- Apple Support: Control access to screen and system audio recording on Mac
- HyNote for Mac
- HyNote Security
Last updated: September 2026. Disclosure: This guide was written by the HyNote team. Features and plan limits may change; check the linked Zoom and HyNote pages for current details.